|
RIG INTERFACE - FLRIG
2 FLRIG interfaces chosen from the Winlog32 Menu
The 2 RCW seperate interfaces can connect to two instances of FLRIG, both can operate independently.
Menu/Rigs/#1:FLRIG
Menu/Rigs/#2:FLRIG
Winlog32 can connect with the FLRIG application via it's Client/Server interface using XML-RPC protocol.
FLRIG can control a variety of rigs and provide an interface to various software like FLDigi, WSJT-X etc.
FLRIG enables a connected rig on a single com port to send/receive rig data to the all connected software including Winlog32.
The RCW/FLRig interface can send and receive frequency and mode, and send basic commands like setting Mode,
VFO Swap and frequency from the RCW, DXCluster and Band View windows.
FLRig is Free third party software, it is not distributed by Winlog32.
FLRIG must be installed and running on your computer to use this interface.
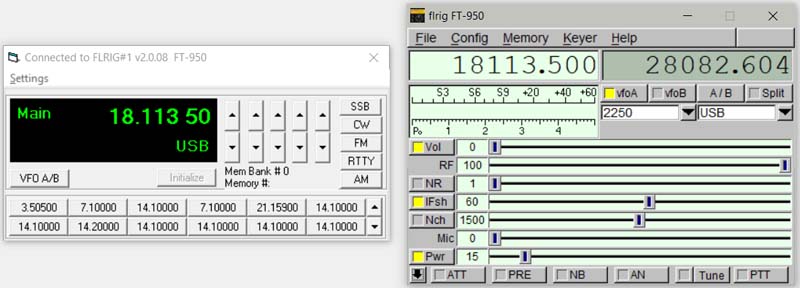
Principal Features of Winlog32 RCW/FLRig:
Main display of transceiver VFO.
Display of Main VFO and mode settings.
VFO display tracks FLRig frequency and mode automatically via a polling method.
Automatically sets Log band and frequency.
Frequency display offset option for transverters.
Swap FLRig VFO A/B.
Set FLRig/transceiver frequency and mode from Control Window.
Control with main, midi or mini window or hide.
Store 240 software memories with frequency and mode in 20 banks of 12 memories.
Transfer memory to VFO by clicking appropriate memory button.
Select and drag frequency/mode from the VFO display directly onto memory buttons.
DXCluster frequency can be transferred from DXCluster Window display by clicking on the
Frequency field in the DXCluster window.
DXCluster Band View can track VFO and band and send frequency to FLRig/Tranceiver
SET-UP FLRIG
Download and install FLRig software.
Set-Up FLRig with your tranceiver and any other software that you intend to use (see FLRig documentation)
In Winlog32, menu/Rigs/#1:FLRig.
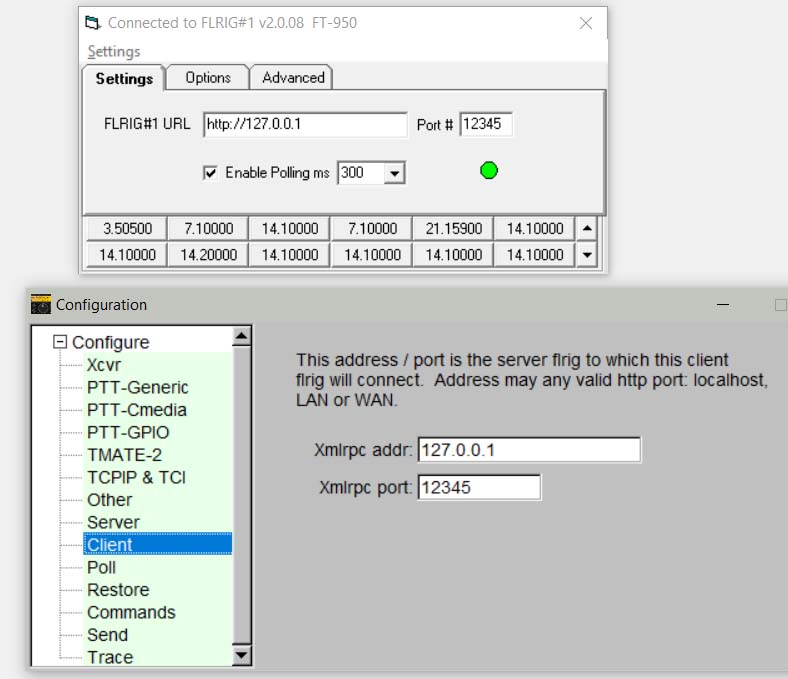
From the RCW menu select 'Settings'
The default http address and port number are set to the same defaults as FLRig
Check these in FLRig, menu item Config -Client: The 'xmlrpc addr.' and 'xmlrpc port' have these settings.
The connection addresses must match in both the RCW and FLRIG, the defaults are 'localhost' = 127.0.0.1 and port number = '12345'.
PLEASE NOTE: The RCW requires a fully qualified http address even if 'localhost' is used, e.g. set to "http://127.0.0.1"
Communication.
FLRIG requires a regular polling method to check the status of the rig for any manual changes.
This is the only method available from FLRIG for the Winlog32 RCW interface.
The connection method is XML-RPC.
The RCW default polling period is 1000mS = 1 second, this can be set between 100-1000mS, depending on usability, performance and preference.
Action:
If FLRIG is already running and the RCW is started, immediate connection should result and data transfer possible.
If FLRIG is NOT running and the RCW is started, the RCW will go into 'slow poll' mode and the RCW initial connection may
be delayed for up to 15 seconds, if the connection is not established after this period of time, the RCW polling will stop and
the RCW 'Initialize' button must be used to start polling again.
If FLRIG is closed when the RCW is still open, the RCW will go into slow poll mode - still seeking the connection,
but as each 'test connection' poll will hang Winlog32 for around 500mS, after a short period of time the RCW will stop polling
and the 'Initialize' button must be used if FLRIG is started again.
Behaviour.
Using default settings in Winlog32 and FLRIG, immediate connection occurs within the RCW default poll period of 1 second or sooner when
the RCW is opened AND FLRIG is already running.
The RCW should respond to any changes in FLRIG Frequency, mode and swapping of VFO.
The RCW can also set the frequency from the Up/Down buttons, from the memory buttons (freq and mode), set mode from MODE buttons, and swap VFO using the VFOA/B button.
Also can set frequency from 'DXCluster#1' and 'DXCluster#2' Window also from the 'Band View' window.
TROUBLE SHOOTING.
If no connection established:-
Check address and port matching.
Check Windows firewall not blocking.
The FLRig menu/config/trace option may be useful to see what data is being exchanged.
The RCW debug window, when enabled will show packet returns from FLDIGI.
RCW menu/Settings/Settings
Start Rig Interface on Start-up.
The FLRig Control window will automatically start on running Winlog32.
Start with window minimised.
When enabled, the control window will be running in the background, although not
visible, it will function normally.
Add Full Frequency to Log.
When enabled, the full frequency from the VFO will be added to the Log; otherwise only the frequency Band
will be added.
Mode Change SSB to J3E (etc.) for Log.
This option is for U.K. operators who may want to add the IARU Mode to the Log.
Only J3E(SSB), A1A(CW) and F3E(FM) are supported as digital modes used can not always be
interpreted correctly.
Change RTTY to [FSK] for log
When enabled will add selected mode to the Log instead of RTTY or other Data modes selected on the Rig.
RCW menu/Settings/Advanced

Debug.
See relative help section on the RCW debug option.
Start at Memory Bank (#).
This will pre-select a memory bank on starting the RCW - see separate section on the Memory Banks.
This option would only be required when using multiple RCW.
Use with a Transverter.
Transverter Offset MHz.
Settings - Other "Transverter IF Offset"
Set to option to 0 if no transvert action is required (default) or select the IF offset from drop list.
to enable.
Offset = Transverter Output Frequency - Rig Output Frequency.
The transverter output frequency will be displayed in the VFO window and also will
be added to Log.
Only upward transverting is supported.
Using The Rig Control Window (RCW).
Interaction should occur in the Control Window when FLRig/transceiver band, frequency and mode changes are made.
FLRig/transceiver should respond when frequency or mode changes are made to the RCW.
Click on VFOA/B button to swap VFO, A to B, B to A.
FLRig/transceiver frequency can be changed by the up/down buttons on the
RCW, the rightmost button changes in 100Hz steps and leftmost changes in 1MHz
steps with corresponding intermediate buttons.
Rapid movement around the available spectrum can be made with appropriate use of these
buttons.
Using the keyboard, the Ctrl + Up/Down arrow keys will rotate the frequencies.
The Ctrl+Left/Right arrow keys will select the appropriate KHz/MHz increment rate.
Change FLRig/transceiver Mode using the Mode buttons, SSB button will
change FLRig/transceiver Mode to LSB or USB depending on Frequency band in use; <14
changes to LSB; >= 14 changes to USB.
To change 'midi' (default) to 'mini' window display.
Double-click on VFO window to change between 'midi' and 'mini' display where you want the
Control window to take less area of the screen.
The mini display shows the VFO (Frequency/Mode) only.
To hide the display, use RCW minimise button. Restore from Windows task bar.
RCW will continue to function when hidden, e.g. add the frequency to the Log.
All display mode and positions are saved upon closing.
MEMORY BANKS.
See separate help section.
|